MOUNT A DEER ON ONE OF THE REAL DEER FORMS WITH ZANESVILLE, OHIO
When the first whitetail mold I had made to start the REAL DEER FORMS series was shipped to Quality Taxidermy Supply, UPS on-line tracking system went down. I waited until the scheduled delivery day and then called down to Quality.
Tammy answered the phone, I asked if they had got the mold yet. She replied, "It just came."
I asked her, "What did you think of the mold interior?".
She answered, "I didn't see it."
"Didn't see it?", I asked.
"No, Terry already has it filled with foam He's pouring a bear right now and can't come to the phone."
Tammy plays the messenger and checks with Terry while I sit there holding the phone in a state of surprise. She then comes back on, "Terry said he's going to pull it as soon as the heat's out, he said to give him about half an hour and call back."
That's great, that's just real great. Now I've got to wait a half hour and go through all the expectant father symptoms. Will he come out with his nose? Will he have eye brows? Will he have his mother's seam lines? Will he even have his head? If I had just WAITED another half hour to begin with I could have got the big surprise and it would have all been over with.
So as not to appear too anxious, I waited about thirty-five minutes before calling back. I asked Terry for the prognosis. He said excitedly, "Popped right out!"
"You're kidding me!", I blurted out. This mold isn't even broke in.
"Nope. As soon as I got it, I coated it with mold release, and filled it up. Once that mold hit North Carolina, it didn't stop walking", he replies. "I'm going to fill it up again and let it set overnight."
That last remark threw me into the expectant father mode again. Not all molds can be left sitting overnight when filled. Restless night coming up.
Next morning Tammy answers the phone. She told me it came right out. Terry yells from the background, "It's smooth as glass!", and Tammy repeated. She also said they were going to get my forms finished and shipped out that day, and if they could get them all done before UPS got there, Dan's would be shipped out too. Well, mine got shipped out that day, and UPS tracking was back up and running, so I got to watch them sit in North Carolina all weekend. Dan's got shipped out on Monday. I got mine in Indiana on Tuesday, and Dan got his in Ohio on Wednesday. Dan and I were immediately back and forth on the phone. We were like a couple of little kids in a toy store.
Thursday morning Dan had said that he would probably mount up the first one over the weekend, but he really wanted to do it now, but had a customer bear to finish.
Friday morning comes and I get a call from Dan. He says, "Hey, I'm going to mount one of those forms today. You want me to shoot a How-To for the web site while I'm at it?".
"I thought you said you were going to mount this weekend?", I kidded.
Dan just laughed and said, "I couldn't wait."
I told Dan that I was planning on adding How-To's to the web site whenever I could get to it at a later date. To do it now was a good idea. Let's GO FOR IT!

Real Deer Form Whitetail Deer Taxidermy Forms
are available from
Kinston, North Carolina
Phone Toll Free 1-888-527-8722
If you want a job done, and done right, give it to a busy man.
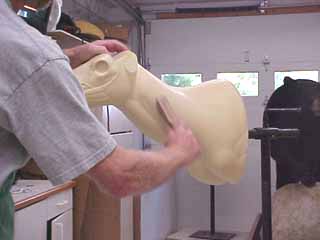
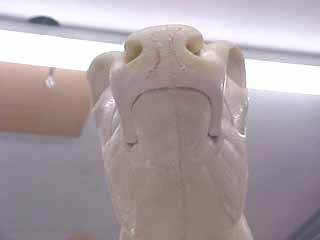
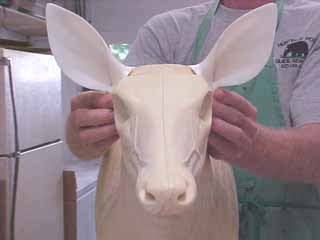
The start of the REAL DEER FORMS line sculpted by Glen Conley is pictured below. 6 1/2" nose to eye, 15" behind the ears. This is the one you're going to see getting mounted.
Stock number 85650150
The 85 identifies it as the 8500 series.
The 65 identifies the nose to eye measurement as 6 1/2".
The 15 identifies it as 15" behind the ears.
The last 0 identifies it as a straight pose.
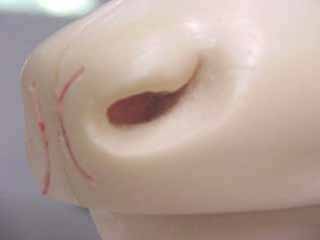
NOTE: You can see here that he got his seam lines from his father's side.
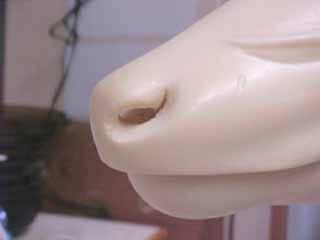
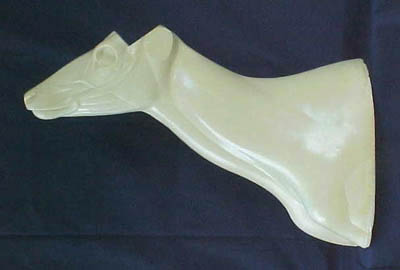
"At the mouth corner, I rock and roll that into something like a funnel shape so that there is a place to fit the excess skin at the mouth corner.
Another nice feature of this form is the chin, lower jaw and lips are actually shaped like a real deer's. When you get to the section on lip tucking you'll be able to see how everything lines right up, and comes out looking right."
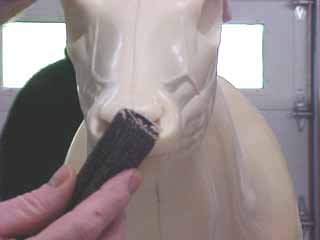
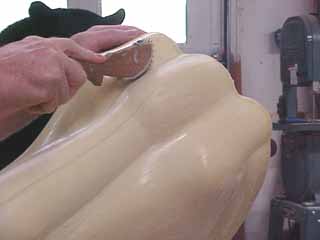
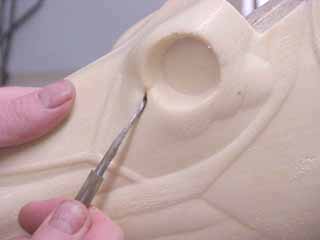
Dan starts out removing the glaze from the larger areas of the form with a Stout Ruffer. The next step will be to carve out the nostril openings.
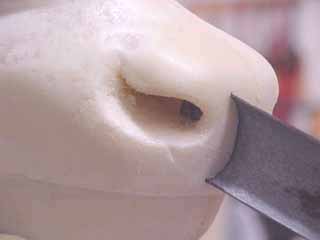
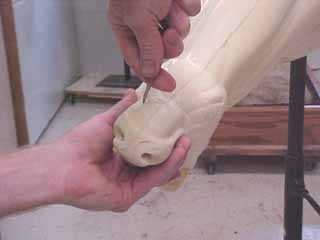
Using a stainless steel modeling tool, he punches the foam out from between the nostril openings. Use of the Speed Septum Tool is illustrated here. It is simply pushed into the foam to create a curved track for the acceptance of the Speed Septum strips.
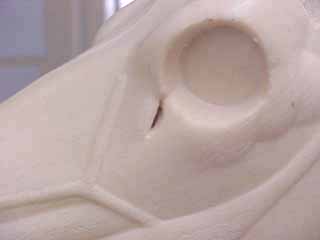
Once the track is made, the Speed Septum strips are simply pushed into place and the excess is trimmed off.
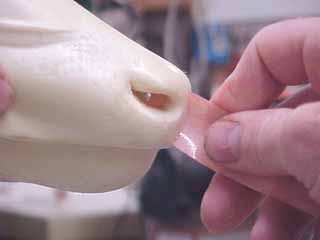
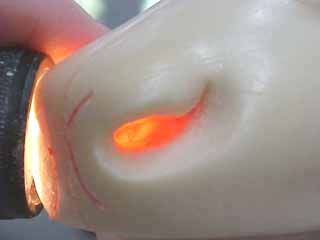
The back lighting displays the translucency of the Speed Septum, and shows the nostril interior shape Dan has created. The ragged edge from trimming the excess is smoothed off with a sanding block.
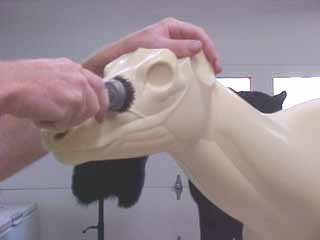
Dan uses a round wire brush for mold release removal in the high detail areas, and a Slim Ruffer in tight areas.
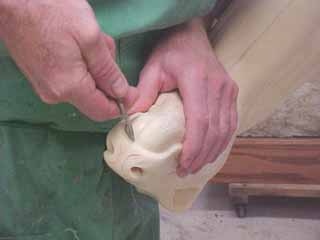
Dan says, "I use my modeling tool to make the slot for tucking the lips. I don't go straight down, but at a little bit of an angle inward. When I get to where the nose pad and lower lip meet, I wobble the tool back and forth a little to gain a little more room for that tight skin to skin tuck in that area.
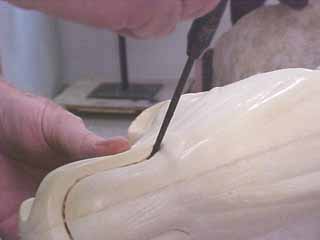
"I use this same modeling tool for a lot of uses. Here I am slotting out the pre-orbitals with it. I make them deep enough that the skin has room to tuck and give a hair to hair line at the gland. You don't want to make these too wide or you can have problems with them pulling out as the mount dries.
I use a slight upward angle that's a lot like you see when you skin out a deer head in this area."
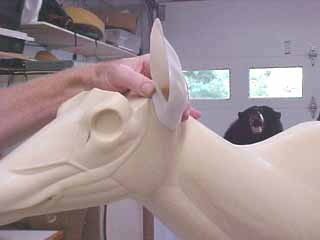
"The earliners fit right up on this form so close it looks like you almost wouldn't even have to use clay!"
If you would like to contact Dan for any full service taxidermy, he is available 9 to 5 week days, and during Ohio's deer season at anytime. Phone Dan Jenning's Taxidermy at 1-740-849-2255
There are nineteen photos illustrating whitetail taxidermy how-to on this page.
STOP-ROT, a truly versatile and multiple use taxidermy product.
STOP-ROT was developed as an aid in preventing hair and epidermal slip. STOP-ROT on mammal skins extends the work time of a fresh hide by slowing down or stopping decompositions. It also helps to prevent freezer burn on frozen specimens. A lot of skins and capes that would normally be trashed can be saved with STOP-ROT. Not only has it been stopping epidermal and hair slips, it has also been improving efficiency of acids in the pickle. STOP-ROT makes fleshing and turning much simpler, faster and efficient.
Apply as soon as possible after the animal has been skinned. If it is a frozen skin or cape, apply as soon as possible during and after the thawing process.
STOP-ROT is available on-line from high lighted suppliers!
RESEARCH MANNIKINS 1-800-826-0654,
Van Dyke's Taxidermy Supply 1-800-843-3320,
Wildlife Artist Supply Company
WASCO (McKenzie) 1-800-334-8012
AEWS Taxidermy Supplies 1-800-529-3470
Taxidermy Arts Supply TASCO
USA Foxx and Fur 1-800-usa-foxx
Helping Hand Hanger Steve Hall 1-269-948-2246
Jim Allred Taxidermy Supply 1-800-624-7507
SIVKO FUR, INC. 1-607-698-4827
James Taxidermy Supply (formerly Kings)
1-662-286-5133
Quality Taxidermy Supply 1-888-527-8722
***************************************************